Tuesday, October 27, 2009

A trip to Nymbol’s Secret Garden

Rumpled Silks on display
The weather was looking good so we took the ferry to Whidbey Island and made our way to Langley, Washington to check out Nymbol’s Secret Garden. Our good friends, Bill and Samantha Cass, have created a really unique concept, and we were all excited to see it person. Creating fairy costumes for Nymbol's Secret Garden is the whole reason I started Rumpled Silks in the first place. I shouldn’t leave out the Cass kids -- Tabitha and Isadora – both accomplished artists themselves. Izzy has great hand skills already (only 7 years old!) and Tabitha creates gorgeous jewelry and magic wands, both of which are hot items at the store.

I hesitate to call it a shop, because it’s so much more than that. It’s also workspace for artists, complete with workshops and classes, plus it's a "playspace" for kids of all ages, with theme parties available in flavors like "pirate", "wizard", "cowboy" and "fairy".

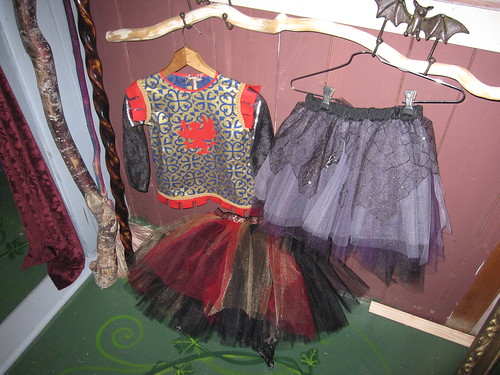
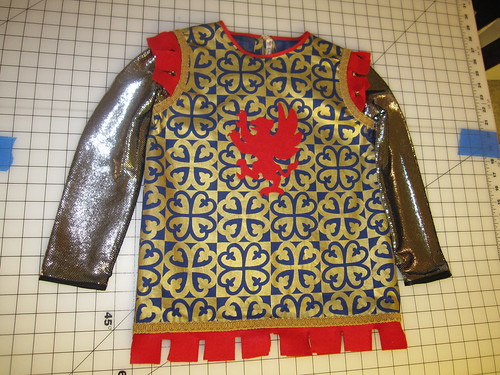
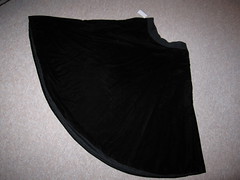
The shop is split down the middle – “objects of desire” on one side, and a giant work table with art supplies on the other side. Since I’d brought an unfinished project with me (the Flame Fairy tutu), I settled down at the worktable with a pile of sequins and tulle. It was fun and inspiring to work amid all the other beautiful things, and I loved the fact that everyone was sitting at the table together working on their own stuff. Sam and Izzy were making little clay skulls to decorate for Halloween, Tabitha was decorating willow wands, and Bill was planning and plotting a new friend for Nymbol (the impish puppet mascot behind this whole operation).

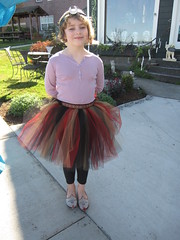
Not to sound corny, but there really is something for everyone. The hubby loved the metal sculptures made from old tools (check out the butterfly made from an old wrench in my slideshow), and we had to come home with a pair of child-sized fairy wings for my little pixie (you can see just how much she enjoyed them in the slideshow as well).

Anyway, if you’re looking for something unique, or just want to hang out with some really cool people, head to Nymbol’s Secret Garden. You never know -- maybe some of the creative juices flowing there will rub off on you, too!

Have fun today!

Melinda

Flame Fairy Tutu


Izzy in Flame Fairy tutu
Originally uploaded by mc-s
Love the colors on this one. Wish I could have gotten the sequins to show up a little better in this photo. There are black sequins dotting the red tulle.

I actually finished this tutu in the workshop at Nymbol’s Secret Garden. It was fun to be there as people were stopping by to check out my other stuff at the shop. Izzy had fun test driving the tutu around Langley. I liked seeing one of my creations on a real kid instead of a sewing dummy. My little munchkin is too small to wear most of the things I make.

Monday, September 28, 2009

For the boys (and warrior girls) .... the Gryphon Tabard

Gryphon Tabard

So far my projects have been pretty “girlie”, with the possible exception of the galaxy cape. I could have seen that going home with some young wizard – though in the end, it went home with a lovely young sorceress in training. But when I saw this crazy blue and gold skirt at the local thrift store, I immediately thought of knights and swordplay. It ended up being my first “boy” project, though I’m all for girls with swords – and boys in tutus for that matter, if that’s what they want to wear.

Celtic print

Anyway, back to the project. The original skirt was definitely homemade, though whoever made it did a nice job (unlike whoever put together the velvet skirt I used for the galaxy cape --uhhh). I took it apart and started lining up the pattern for the best fit on a small-sized tabard. I thought I might be able to squeeze two tabards from the one skirt, but alas – the pattern was too big and the old seams left too many holes that I had to work around. I’ll be using the skirt leftovers as heraldry on another tabard for certain – it’s too nice to waste.

matching patterns

I spent WAY too long deciding on a symbol to place on the front of the tabard. In the end, I settled on a griffin – a symbol of courage and strength in medieval heraldry. I love the look of the red griffin along with the red dagging on the hem and sleeves. The “chain mail” arms came from a great little piece of fabric I found in a remnant bin, and the braided trim is a leftover from another project. So with the exception of the red felt, every bit of this tabard is reused/recycled materials.

Gryphon close up

The “Gryphon tabard” is available at Nymbol’s Secret Garden on Whidbey Island in Langley, Washington. If you are interested in this tabard, or any other projects, you can contact me via email for more details. And I’m always happy to share what I know, so if you’re interested in more information on any of the techniques I’ve used, I’d love to hear from you.

Have fun today!
Melinda

Thursday, September 10, 2009

Galaxy Cape


Galaxy Cape
Originally uploaded by mc-s
Project update: I sent out the teaser a few weeks back about this sweet black velvet skirt I found hanging out in my local thrift store. Well, I’ve finally made some progress – behold the Galaxy cape! This is definitely kid-sized, though a smaller adult might be able pull it off, too.

The disassembly of this skirt nearly took as long as it did to make the new cape. It was very clear that it was a home-sewn project, and the person who made this thing really over-built it. I literally spent hours carefully ripping out yards and yards of zig-zag stitching so as not to damage the velvet. Try picking out tiny black stitches on black velvet sometime– it’s maddening!

Anyway, once I had a nice big piece of velvet, I was ready to rock. I sewed the star sequins in place first. If you’re ever making something that’s lined like this cape, that is definitely the way to go. Trying to sew them on after the fact without catching the lining would have been tedious and I don’t think it would have looked nearly as nice.

I was going to use red satin for the lining, but instead I choose butter yellow. I liked the way it glowed beneath the black, and also the beads I used to attach the sequins had a slight golden cast to them, so I liked picking that up in the lining. Looking at the finished product, I’m happy I didn’t use red. It would have looked more “Dracula” than “wizard”, which is what I was going for with this design. Though I do have another big piece of velvet left for another project --- hmmmm ….

Have fun today!
Melinda

Saturday, September 5, 2009

Anansi Girls? Spinning a cobweb tutu


I’m always inspired by other great artists, and one of my favorite writers is Neil Gaiman. I just finished reading his novel Anansi Boys this week, which is all about the spider god Anansi and his two sons, Fat Charlie and Spider. There also happens to be a bit of a spider invasion going on at our house, so I’ve had arachnids on the brain for a week or so now. The “final strand” in my cobweb tutu design came together when I was looking through my fabric remnant pile, and re-discovered some web-patterned netting from a goth-inspired Little Miss Muffet dress I made a few years ago. The pieces were in place – now to get sewing!

I choose black, eggplant and lavender tulle for this project. The web netting really needed a layer of something light in color underneath to show off the pattern – it was lost with just black beneath it.

Once the skirt was put together, I started adding sequins to the spider webbing for sparkle. That looked pretty good, but the star of the show was missing. I needed a spider, and the plastic ones you get at Halloween would not do. I had some faceted black buttons that came off a thrift-store project skirt, so I used one for the head. I found another fancy button for the body, and made the legs out of silver seed and bugle beads. I tried sewing them directly onto the netting, which was a BIG mistake. Thank goodness I tried it out first on a scrap first. I would have cried if I ruined all my hard work on that skirt on the last step like that.

Instead of sewing, I used some super fine-gauge wire to build the legs and wire the two buttons together. After a few misfires (it was my first crack at using beads and wire like that), I had a really good looking spider.

So there you have it – a cobweb tutu just in time for All Hallow’s Eve. It will be making its way north to Nymbol’s Secret Garden very soon!

Thursday, September 3, 2009

Grand Opening! Grand Opening!

My good friends, Bill and Sam Cass, are celebrating the birth of their new baby -- Nymbol's Secret Garden (they already have two beautiful and talented daughters to be proud of). The Cass clan is responsible for Rumpled Silks, really -- they asked if I would like to create some fairy fashions for their store/design studio, and that's how the whole thing started.

Anyway -- you should check it out if you're in the Whidbey Island/Seattle area. The Grand Opening is this Saturday, and I'm completely bummed out that I'm going to miss it. I hear that a real pirate queen will be there to lead the sing-a-long. It's absolutely worth the trip, and it's the only place to buy Rumpled Silks fashions! Check out the poster -- it does a better job of describing the whole vibe than I ever could:

Wednesday, August 26, 2009

Project Preview


Found this amazing black velvet skirt and some other great treasures on my latest thrift store crawl. Can't wait to get my sewing machine back from a much-needed tune up.

Monday, August 24, 2009

Ribbon remnants reborn into tulle tutus


I had some ribbon remnants leftover from various projects that were really too small to use on any large projects. Since I hate to let pretty things go to waste, I decided to use them as the inspiration/decoration on some tulle skirt. First up, the Black Orchid tutu. I had some a black trim with a bit of an art-nouveau feel featuring lavendar and pink flowers and silver accents that I thought would look quite nice on a waistband. I picked up the light colors of the ribbon in the top layer of tulle, then placed a layer of black underneath in an alternating pattern. It takes a LOT of pins to attach gathered tulle to a waistband. Many ouchies go along with the sewing of these skirts. To finish it off, irridescent sequins with silver beads dot the top layer of tulle. By the way, sewing sequins and beads onto tulle is the sure way to insanity. They do look so nice, though. Good thing I'm already a little crazy!

Skirt number two, the Circus tutu, is based on the one little piece of ribbon left from the Twilight Cape. At just 15 inches long, this little leftover wasn't going to go very far! I sewed it onto a length of 2" wide black satin ribbon, and started choosing tulle. I loved the "harlequin" look of alternating larger sections of black tulle with smaller sections of pink and gold glimmer tulle. Gold and irridescent sequins added extra sparkle, and I deliberately left the black areas matte and unembelished for contrast. I really like the way it turned out, and I think I'll use that harlequin-style pattern on some other skirts. It looks so pretty and reminds me of a old-fashioned circus costume (hence the name of the skirt).

Both of these skirts are available for sale at Nymbol’s Secret Garden in Langley, Washington (on Whidbey Island). If you are interested in them, you can contact me via email for more details. And I’m always happy to share what I know, so if you’re interested in more information on any of the techniques I’ve used, I’d love to hear from you.

Have fun today!
Melinda

Saturday, August 22, 2009

Rumpled Silks Label


Rumpled Silks Label
Originally uploaded by mc-s

I bought these labels online from http://www.namemaker.com. I was quite pleased with the results. Love that they had a little spinning wheel icon. If you want some nice woven labels with your name on them, give them a try.

Dying disco scarf reborn as Twinkle Tutu


The Twinkle Tutu began when I spotted this fabulous silk scarf with sequins languishing in a thrift store. It was too pretty to waste!

I carefully opened up the seams, and went to work. Since it was my first fairy skirt, there was a lot of advanced math involved in getting the material distribution just right on the mountain of tulle needed to make this skirt suitably “poofy” – 20 yards gathered down to a 22-27” waist! I even managed to reuse the sequins that jumped ship during construction, hand sewing them onto the tulle. Tedious, but lovely – and I hate to waste a single bit of glimmer and glam.

I’m pretty pleased with the results, and there’s more scarf left – so expect something else fun from this faded finery.

The Twinkle tutu is available at Nymbol’s Secret Garden in Langley, WA (on Whidbey Island). Stop by the shop (it’s REALLY amazing) and say hello to Nymbol and the rest of the Cass clan. You can also email me if you’re interested, or if you have any questions about any of my projects. I’m always happy to share my knowledge!

Have fun,
Melinda

Twin Capes from a Single Skirt


I spotted this gem at a thrift store -- a size 4 Evan Piccone pleated gold lame skirt. I’m not sure what year it's from (I’m guessing the late 80s), but it was old enough to sport a “Made in the USA” label. The lame had a beautiful patina to it, with a deep, rich sheen. It seemed like a good candidate for a magic cape of some sort. And even though it had a VERY tiny waist (22”!), I was actually able to cobble not one, but two lovely capes from it.

I removed the waistband and the zipper, split the skirt into two pieces, and taped down the pleats so they would survive the transplant (masking tape is your friend in situations such as these). It was such an efficient operation that all that was left of the skirt after I made the capes were a few tiny bits of lame.

Cape #1 – Twilight cape with black velvet trim
For the first cape, I decided to use the waistband of the skirt as a neck band. Since the waist of the skirt was so tiny, I knew only one cape would be getting this treatment.

I loved the look of the medium-blue taffeta as the lining, and the iridescent trim with hints of blue really tied them together nicely. But I felt it was missing something. That’s when I noticed a length of wide black velvet ribbon stashed in my trim basket. Perfect.

After adding a black frog closure at the neck, it was ready for action. It reminds me of some kind of invisibility cape with its dark, shimmery movement. As soon as she saw it, my toddler daughter grabbed the cape, squealed and danced around the room with it. She tried to escape with her new found treasure, but I chased her down. This cape is a little too long for her. She’ll be getting something a little shorter so there’s less danger of her tripping over it. My little pixie must have a cape of her own!

Cape #2 – The Rose cloak
There is something so striking about the mixture of gold and deep rose. As a child, I had a Barbie doll coat that was gold lame lined with rose, and I think that subconsciously influenced me. I didn’t want to make a clone of the Twilight cape, plus I had already used up all the waistband material for cape #1, so I had to get a little creative with this design. I decided on a cloak with a velvet drawstring closure, and a collar that showed off the gorgeous lining material. This cape was going to be more about fairy-tale flash than concealment! I loved the addition of an antique-looking trim on the other cape, so I tracked down a trim for this cloak as well. This time, I placed the trim on the inside edge of the cloak, since it would show at the collar that way, and because of the way the cloak hangs from the body.

Getting the pleated outer cloak to lay just right on top of the non-pleated inner lining was a bit of a challenge, but in the end the Rose cloak turned out much more fabulous than I even thought it would. And, it turns out, it's fully reversible (bonus!). I think it might actually be prettier on the inside. Who knew?!

Both of these capes are available for sale at Nymbol’s Secret Garden in Langley, Washington (on Whidbey Island). If you are interested in them, you can contact me via email for more details. And I’m always happy to share what I know, so if you’re interested in more information on any of the techniques I’ve used, I’d love to hear from you.

Have fun today!

Melinda


What Rumpled Silks is all about ...

I really enjoy dressing up. As a child, I had a collection of old dance costumes from my mother and her two sisters, including several gorgeous tutus from the 1950’s plus a box stuffed with costume jewelry from my grandmother. I learned to sew at a very young age (thanks Mom!), and started making clothes for myself and my dolls as soon as my skills were up to snuff.

Until now, my creations have been almost exclusively for myself. I’ve dressed up as everything from a gothic vampire to Miss Helga from the VW commercials. Whatever the character, I love creating super-detailed costumes that look and feel as authentic as possible.

So what changed? I became a mom. Now I want to create costumes that my daughter and other kids (of any age) can enjoy. But I’m not loading up on pre-made patterns and yards of fresh fabric. Instead, I’m spinning my new creations out of recycled glamour. I comb thrift stores and yard sales for bits and pieces that can find new life as a magic cape or a fairy’s dress. Whenever I can, I spin leftover remnants into exciting new handmade creations. Each one is unique by design – it has to be since it’s coming from one-of-a-kind finds and limited materials.

I love the challenge of making things work, and I hope you’ll love my designs as well. I guess you could call me the “green” alternative to mass-produced costumes made from cheap and flimsy materials. I like to think of it as a rescue mission – saving faded fashions and unloved fabrics from the landfill.

Have fun today!
Melinda